I wanted to share with you a giveaway from a fellow nail gal. She has a blog, is on Pinterest, and has a Facebook page. She is the : Do It Yourself Lady. I will include the links to her blog and Pinterest.
Blog: http://doityourselflady.blogspot.com/
Giveaway: http://doityourselflady.blogspot.com/2012/04/giveaway-time.html
Pinterest: http://pinterest.com/thediylady/
Thanks for reading. See you soon. :p
Tuesday, April 24, 2012

Life Gets In The Way
I'm sorry I've been absent for a while. I had my power shut off and was at my mom's for a few days. Now everything is taken care of and I'm back to rockin' and rollin'. I don't have anything significant to post because of being away from home. Just a few pictures. I have a future tutorial in mind, but it won't be for a few days. I want to get the kids settled back in and back into a routine.
Here is my Sunday, April 22nd mani from Adventures In Stamping. (The challenge was music that inspires you. Mine doesn't really inspire me, but it works. lol) I did: These Boots Are Made For Walking
.jpg)

Here is my Sunday, April 22nd mani from Adventures In Stamping. (The challenge was music that inspires you. Mine doesn't really inspire me, but it works. lol) I did: These Boots Are Made For Walking
.jpg)
I also did the mani challenge for Monkey See Monkey Do. Here's what I came up with.

My inspiration came from Pinterest. I changed the colors to match my shirt and had to use different plates because I didn't have the same ones. It came out okay. Here's the link to the pin form Pinterest: http://pinterest.com/pin/114912227962370094/
Thanks for reading. See you soon. :p
Thursday, April 19, 2012
New Image Plates!!!
Guess what ladies?! I received some Nail Mail today! That's right the Cheeky plates I ordered came in this morning. Of course with a band new set of plates sitting there I couldn't help but stamp. (Even though I have two challenges this week and a wedding on Saturday.) With that being said this should be short and sweet.
In the mail today I received Cheeky's 2012 collection.


In the mail today I received Cheeky's 2012 collection.

Here is the link from Amazon if you're interested: http://www.amazon.com/gp/product/B006OMHR1S/ref=oh_details_o00_s00_i00
I didn't test ALL the images, but the plates are good quality and everything I did stamp stamped GREAT. I recommend these to all my fellow stampers.
So, after looking through all 26 plates and 160 designs this is what I ended up with.

Now, while you're sitting there enjoying my creative genius (lol) get on Amazon and order your plates. They come in a timely manner and they stamp wonderfully.
Thanks for reading. See you soon. :p
Monday, April 16, 2012
Sponge Technique Gradient...
I know, I know, my last post was about gradient nails, but this is gradient nails with a different technique. I went out and bought a pack of makeup sponges (I got 28 for $1.25) and decided to try the sponge technique.


First you need makeup sponges. These can be found just about any store and are fairly cheap.

Here are the colors I used:

I put one coat of the Sally Hansen Diamonds (I believe the color is Glass Slipper.)

Next I cut the sponge to fit my nail. (Oh and don't throw away the unused sponge. They are GREAT for cleaning off image plates.)

I then taped my thumb to help with clean up. You just need plain old scotch tape. I highly recommend this step. It's time consuming and a pain, (the reason I honestly only taped my thumb) but it helps with clean up tremendously.

All you do is paint the colors on the sponge in the order you want them. It doesn't matter if they over lap. Then sponge the color on.

After all my nails were finished I put on a clear coat. Then decided it needed...wait for it....a stamp! I used Konad black stamping polish and Red Angel 113 image plate and added another clear coat.

I was very pleased with the end result. I do think I could use some more practice though. There is a great YouTube video to show you how to perform this technique. I highly recommend checking it out before attempting to do it on your own.
Here is the link to the YouTube video I used:
So, there you have it. Now you have two ways to get the perfect gradient. While you're out surfing the web stop by and visit my fellow stampers blog and enter her awesome giveaway.
Here's the link: http://
Thanks for reading. See you soon. :p
Thursday, April 12, 2012
Gradient Nails....
There's a Facebook group called "Adventures in Stamping" that does weekly challenges and one of the challenges to vote on this week was gradient nails. I had never done a gradient before so I watched a couple of YouTube videos and gave it a try. Most of the videos show people using make-up sponges. I on the other hand didn't have any (I'm not into foundation all that jazz) so I tried by just painting them into a gradient.
First off, here are the colors I used:


First off, here are the colors I used:

The first step I did was paint my whole nail with the light color. I know it is a pink and my other two colors are purple, but I didn't have any light purple and it ended up working well with the other colors. I only used 1 coat of the light color.

The second step was to add the medium shade (or the lighter purple) to the nail. Only paint about 3/4 of the nail NOT the whole nail. Also only do one coat.

The next step is to add another coat of the medium shade, but leave a small "line" of the first coat of the medium shade unpainted. (Remember to let your nails dry between coats.) Then repeat the process one more time. You should be getting a layer effect at this point.

I promise there is an end in sight. lol Now, take the dark shade and add one "line" at the tip of the nail. (I actually did two coats when I did this step.)

At this point I was NOT impressed with my work. It looked uneven and messy and I just wasn't feeling it. Then I added the glitter polish. I don't know why, but the glitter polish pulled it together. (Probably because you couldn't see how choppy it looked.) So, now add your the glitter, girls!

See, glitter makes EVERY thing better! :)
I'd like to say that this was the end of my adventure. That the sun was shining and I skipped off into a field of wild flowers. Unfortunately, it's not :( I decided in all my brilliance to stamp some designs onto my nails.
My first color is:

I used Red Angels RA-102 for my first stamp.

Okay, not too bad. Still looks alright. Then in another act of pure brilliance I added another stamp.
This is the color I used:

I added the dragon fly from Konad plate M5.

Needless to say neither of the designs showed up very well and it just looks too busy or crowded or something.
Though, I may not have been happy with the final outcome. I think my first try at a gradient nail turned out pretty good. It is something I will definitely try again.
Thanks for reading. See you again soon. :p
Tuesday, April 10, 2012
Some Examples...
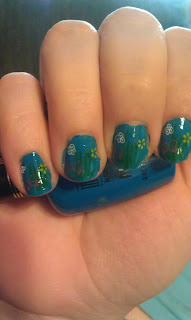
Well now that you know a little about myself I thought I should add some of the designs I've done.




My First Blog...
So, this is my first blog ever. Where do I begin? I guess by telling you a little about myself. I'm 31 years old. I've been married for 13 years. We have three kids a 13 year old daughter, a 11 year old son, and a 6 year old daughter. I am going to school for my associates degree in nursing, but am on a leave until my number is called for clinicals (where I go to school you are put on a waiting list).
I just recently started nail stamping and I'm in LOVE! When I was a teenager my nails were always painted. I always played with funky colors and designs (before it was "cool"). As the kids came along I had less time and to be honest got lazy and lost interest in doing my nails. Now, with this new stamping craze I'm hooked (again lol). My plate collection is small as is my polish supply, but that's okay. I work with what I do have and it's all good.
For those of you who haven't tried stamping, but have thought about it, go for it. It is an easy way to dress up your nails and use some creative energy. In fact it's a good way to do something nice for yourself (even on the days you don't even feel like getting dressed). Though I didn't find it as "easy" as the how to videos with a little practice (and patience) you'll become a natural. Even my 13 year old can use the stamping kit (in fact she caught on faster than I did). The best thing about stamping is my girls enjoy it to. It gives us some quality one on one time. Plus when I have a house full of teenage girls it gives them something to do QUIETLY! :)
I just recently started nail stamping and I'm in LOVE! When I was a teenager my nails were always painted. I always played with funky colors and designs (before it was "cool"). As the kids came along I had less time and to be honest got lazy and lost interest in doing my nails. Now, with this new stamping craze I'm hooked (again lol). My plate collection is small as is my polish supply, but that's okay. I work with what I do have and it's all good.
For those of you who haven't tried stamping, but have thought about it, go for it. It is an easy way to dress up your nails and use some creative energy. In fact it's a good way to do something nice for yourself (even on the days you don't even feel like getting dressed). Though I didn't find it as "easy" as the how to videos with a little practice (and patience) you'll become a natural. Even my 13 year old can use the stamping kit (in fact she caught on faster than I did). The best thing about stamping is my girls enjoy it to. It gives us some quality one on one time. Plus when I have a house full of teenage girls it gives them something to do QUIETLY! :)
Subscribe to:
Posts (Atom)